
For the last few days, I have been working on the Contoso Sales data to create a Power BI report as part of the learning. Currently, I am using the default ready to go Power BI data model provided by Microsoft which can be found here. As Microsoft Fabric is the new tech buzz, so I thought why don’t I get this data somehow in the Fabric environment. If Fabric is still the new term to you, you can go back and check my following blogs on it to get a better understanding about it:
Getting Database Set-up on-Premises
Before I talk about getting the data into Fabric environment, the first thing I did was getting the Contoso Sales data somehow in a proper database on my machine. The ready-file that Microsoft provides, doesn’t allow you to access the actual data behind it. But there are ways to get this data somehow in a database, say a SQL Server database on your machine/pc. All the steps on how to get Contoso sales data on a SQL Server database can be found here. The only prerequisites to get this set-up is:
- Microsoft SQL Server installed on your pc – download link
- Microsoft SQL Server Management Studio installed on your pc – download link
Once you have set-up everything properly, opening your Microsoft SQL Server Management Studio should look like this:
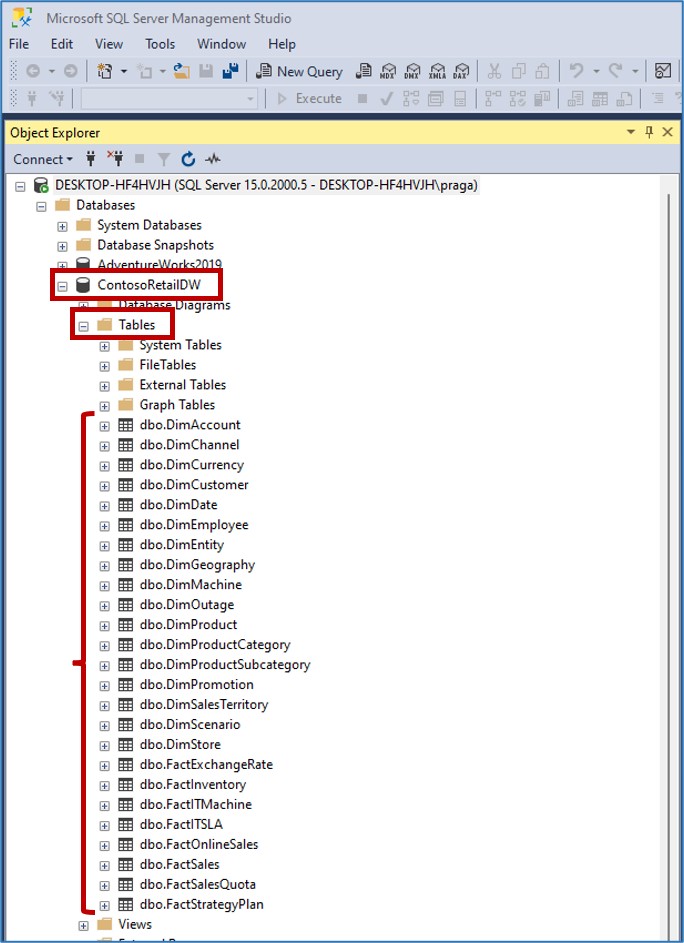
Ignore the AdevntureWorks2019 database as I have got that set-up as well on my end. Just wanted to point here, that I have used Windows Authentication to connect to my database which is also the default way currently set-up on my end.
Cool so now we have got the database on our machine on the SQL Server instance installed on-premises. Now the question comes how do we get this data in the Fabric environment. So the approach I will be taking today is to get this on-premises database data into the Fabric Lakehouse. I will referring the SQL Server database on the pc to on-premises database in this blog from now onwards.
Getting Fabric Lakehouse Set-up
The first thing I will do is create a new Fabric enabled workspace where I can create a Lakehouse and put this on-premises data in. You can refer my previous blog on creating your Fabric workspace. I have created the following Fabric enabled workspace:
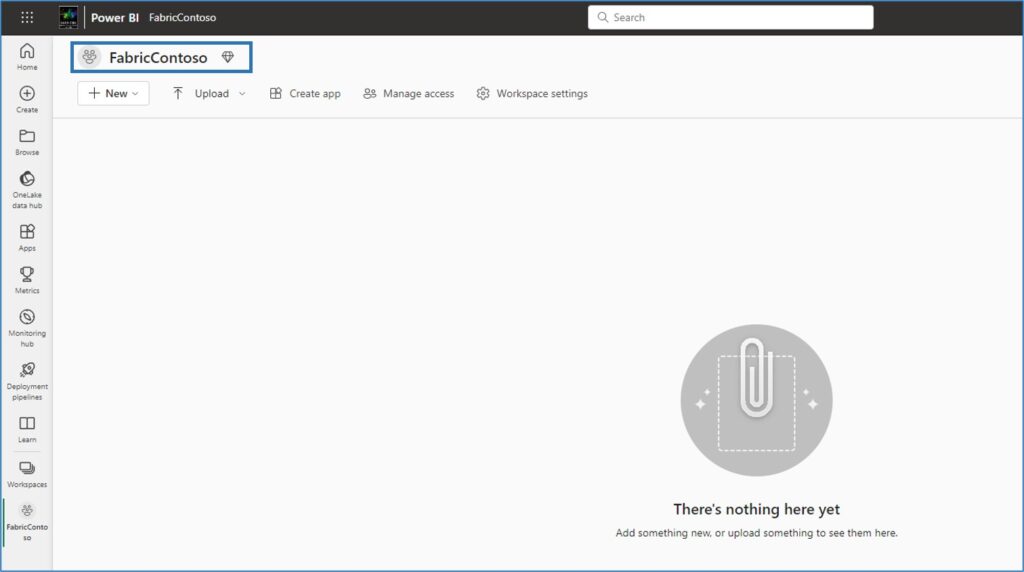
As I talked earlier is, I want to get my on-premises data to a Lakehouse in Fabric. So for that let’s create a Lakehouse in our FabricContoso workspace. Once I follow the steps shown below, I end up seeing an empty ContosoLakehouse created in my fabric workspace.
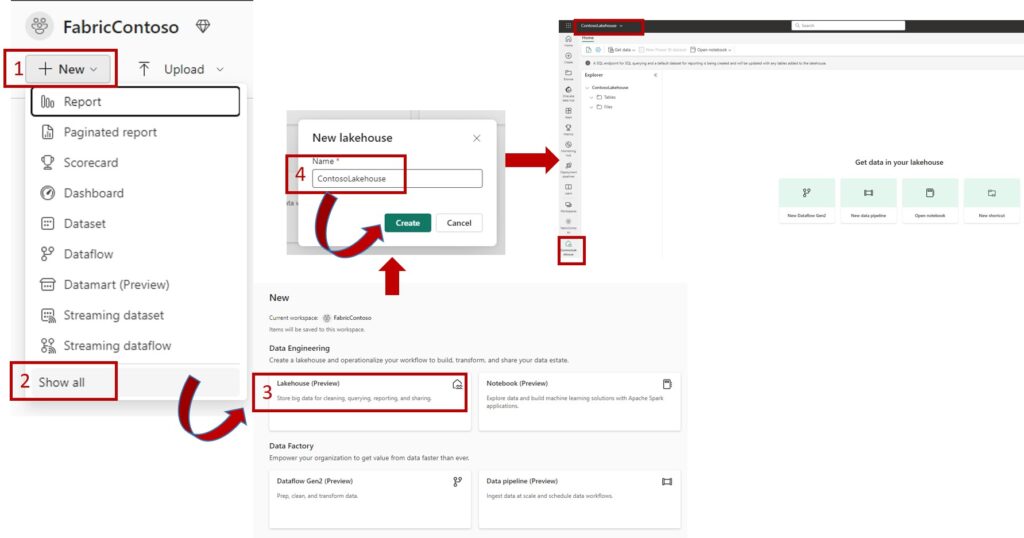
On my ContosoLakehouse, I see the following options to ingest data:
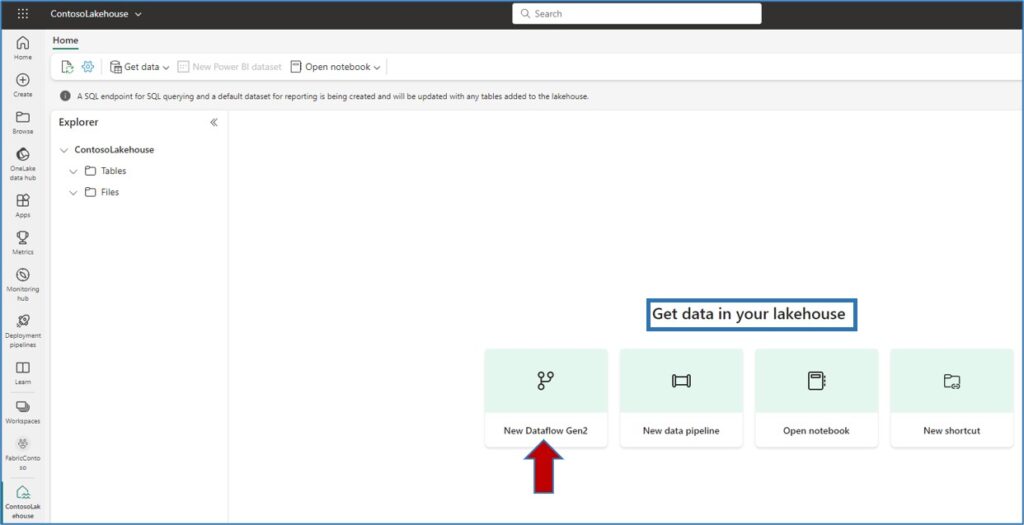
We will choose New Dataflow Gen2 option to ingest data into our Lakehouse. Once we select this option, we choose SQL Server database as an option to connect to and the final window pops up to provide connection settings.

Now the next question that comes to my mind is how do I make the Power BI Service aware of my on-premises database? There should be a way so that in the Connect to data source window, when I give my on-premises database server details, they should be accepted. If you are coming from Power BI world, you already know answer to this. Here comes to rescue our beloved Power BI Gateways. A Power BI gateway helps your on-premises database to communicate with the Power BI Service.
Setting up Power BI Gateway
The next thing we are doing here is downloading and installing a Power BI gateway to our machine.
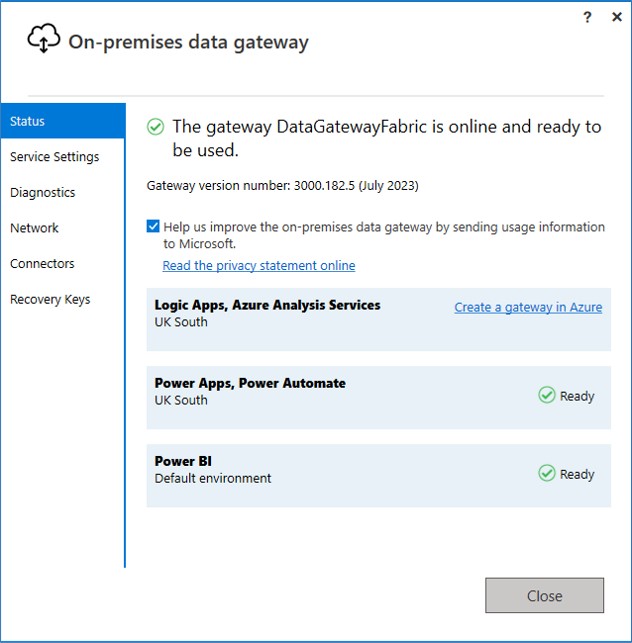
Just run the executable file and follow the instructions and your gateway will be installed. I have installed the gateway in the standard mode. Once you login in the gateway with your credentials, you will see the gateway is running and up.
Once our gateway is up and running, we need to check if it is communicating with the Power BI Service. We navigate to little gear icon –> Manage connections and gateways –> On-Premises data gateways. I can see that Power Bi service can see a gateway which is online. This confirms our Power BI Gateway is communicating well with Power BI Service.
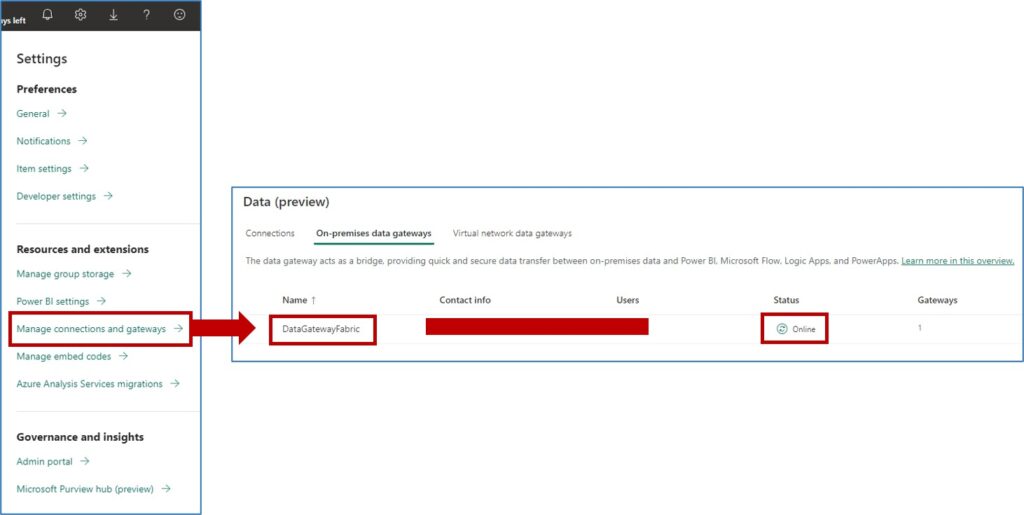
Perfect we have set-up a process where we can make our on-premises database identified by the Power BI Service via Power BI Gateway.
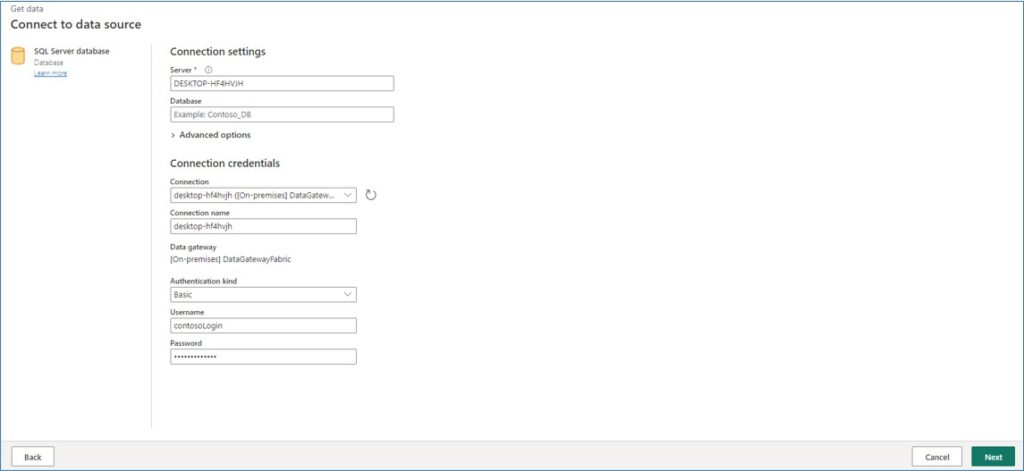
Next, let’s connect to the SQL Server database in the dataflow Gen2. We go back to the following window and try to fill in the details:

Now if you notice here, you have an option to connect to your on-premises database using a Basic or Organisational authentication methods. Organisational authentication method will not work as this is connecting to the on-premise database. So we only have option to go via Basic authentication method. For this, you will need to create a proper username and password to log onto your on-premises SQL Server database.
If you remember, in the start of this blog, we connected to our SQL Server database using Windows Authentication as that is the only mode currently enabled for connection. Let’ look at modifying few settings and creating a username and password for the database login.
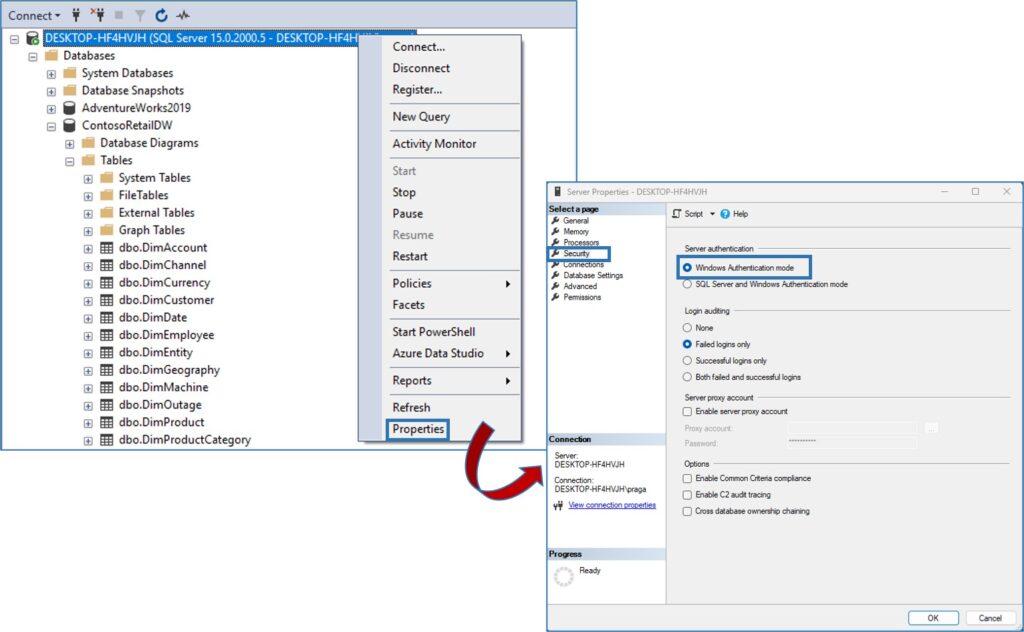
Modifying the Security Setting for the Server
Open SQL Server Management Studio and connect using windows authentication. You will see all the databases and tables along with other artifacts. Right click on the server name –> go to Properties, a new window opens. In that new window select Security and enable SQL Server and Windows authentication mode. Then hit Ok.
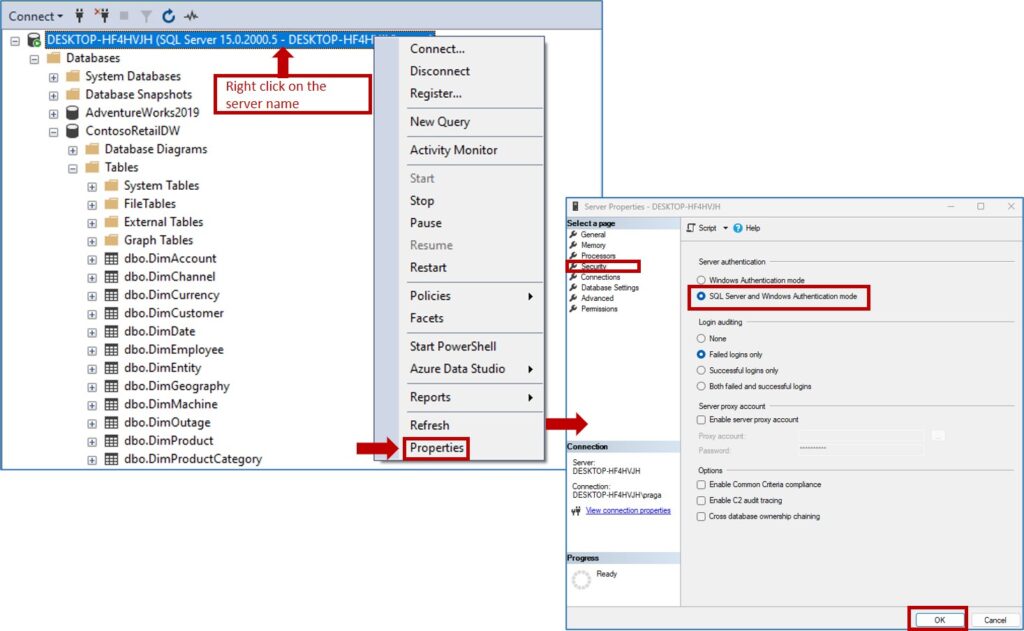
Basically, using this setting, we have enabled both kind of authentications to the on-premises SQL Server database.
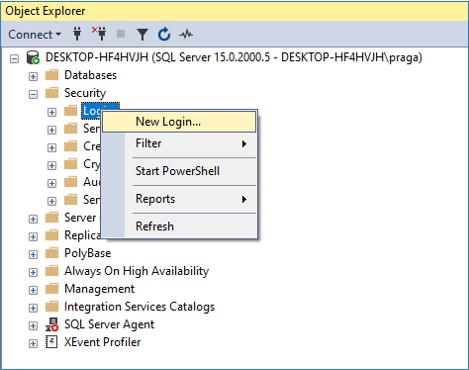
Create Security Login
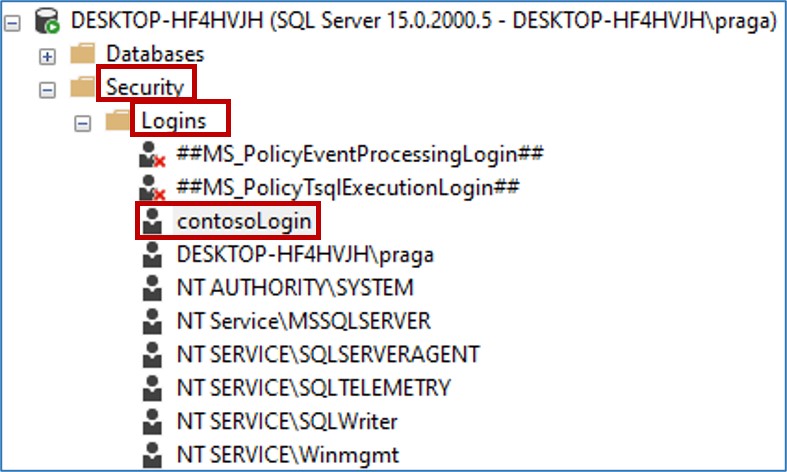
In SQL Server Management Studio, we first create a Login and then we create a user against that login. In the Object Explorer, expand Security –> Right click Logins –> New Login.
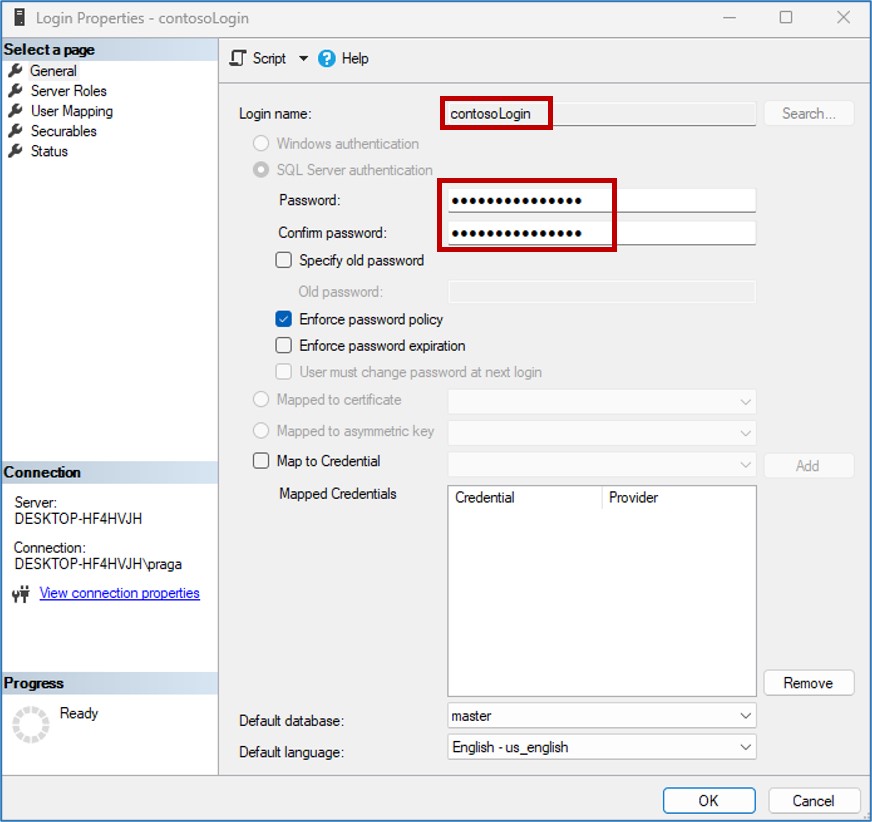
A new window appears and fill in the details accordingly on the General tab.
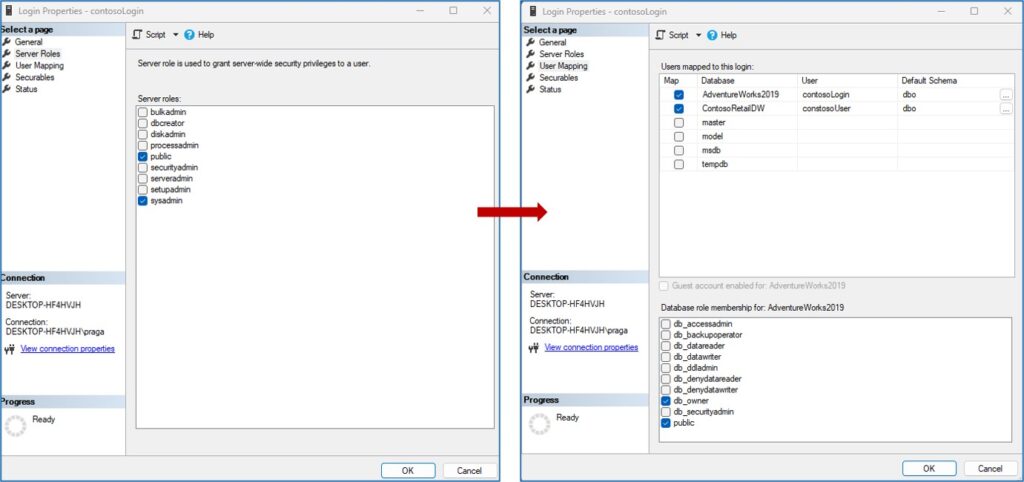
Fill in the details under Server Roles and User Mapping. Make sure to check the right options related to permissions and then hit Ok.
- public and sysadmin on Server Roles
- public and db_owner on User Mapping
Trust me if these permissions go wrong, you will be spending a lot of time in troubleshooting authentication errors.
You will see your login created under Security –> Logins section.
Create Security User
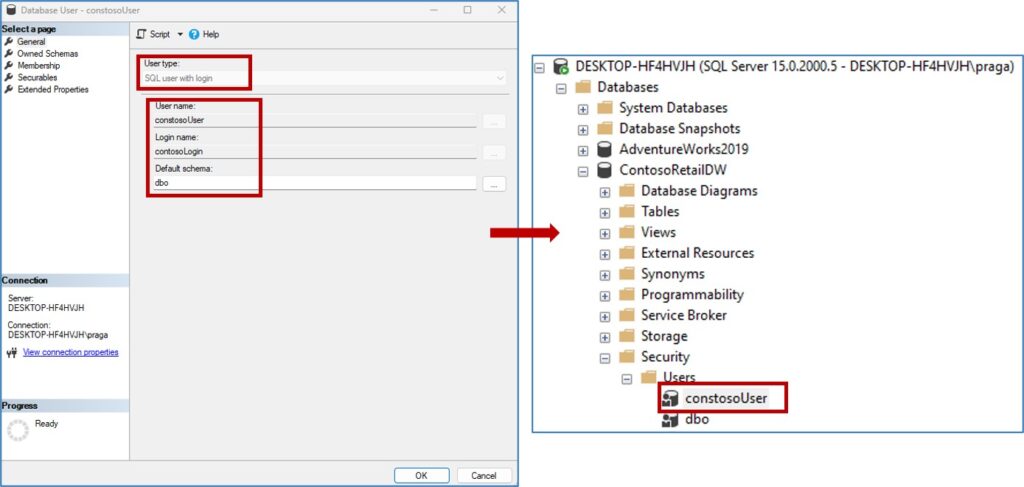
Next step here is creating a security user against the security login that we created above. As we want to get the Contoso sales data, we will create this security user against this database. Navigate to ContosoRetailDW (this will be a different name in your case). Security –> Users –> New User.

A new window will appear to add a new security user. Fill in the details accordingly and hit Ok. You will see your user is created.
- User type –> SQL user with login
- User name –> contosoUser (you can choose something else)
- Login name –> contosoLogin (security login created in previous section)
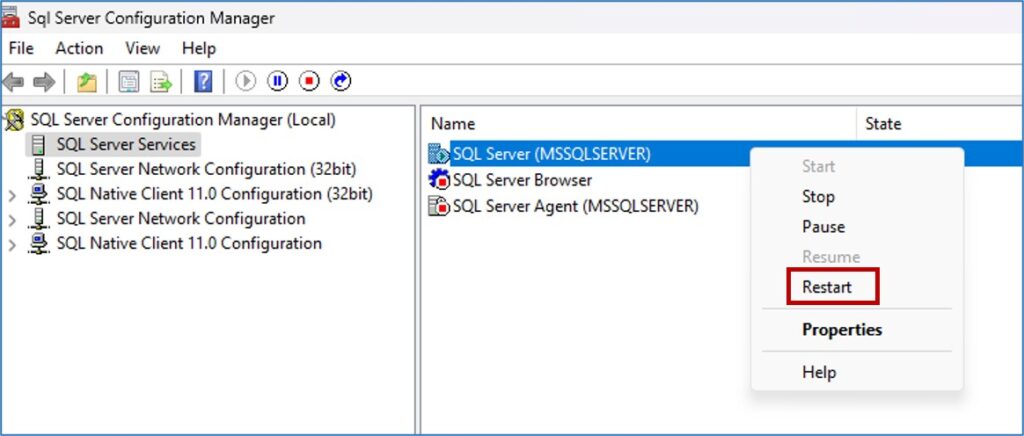
Restart SQL Service in the SQL Server Configuration Manager
As we have added the security login and user for the SQL Server connection, we need to restart this process just to make sure, changes have been saved properly.
- Open SQL Server Configuration Manager
- Just restart the process highlighted in the image below.
Once the process is up and running again we are good to move to the next steps.
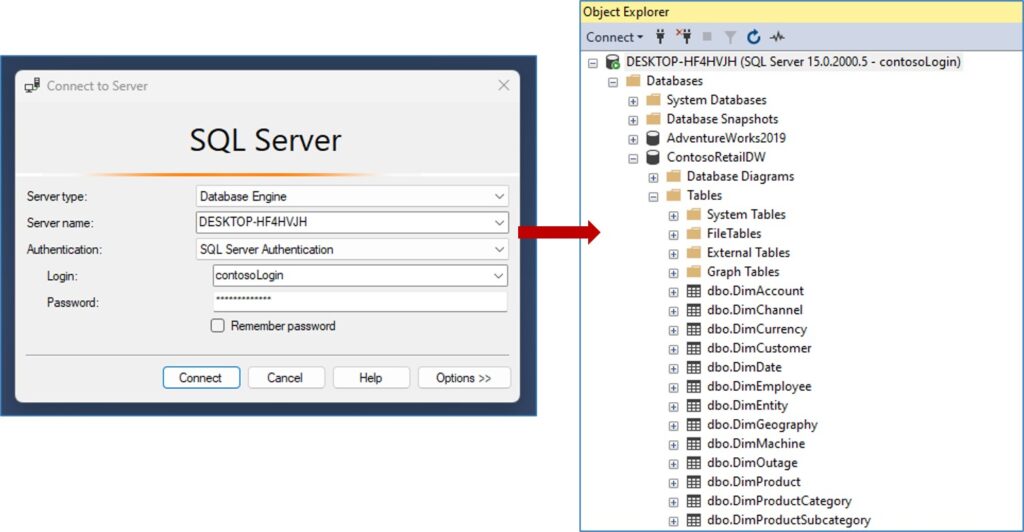
Testing SQL Server Login in the SQL Server Management Studio (SSMS)
Open SSMS and this time try to login using SQL Server Authentication type. Enter your login credentials and hit Connect. You will be successfully connected to the database and can see tables within it.
If this is not the case – for example you see the database and no tables in there; I suggest checking the permissions we set-up while creating security Login in the previous section.
Connecting On-premises Database to Fabric Lakehouse
Let’s now go back to our fabric workspace, where we chose Dataflow Gen 2 option to ingest data and chose SQL Server database connection type. Make sure your gateway is running and online. We will in the relevant details on the window below and hit Next to connect.
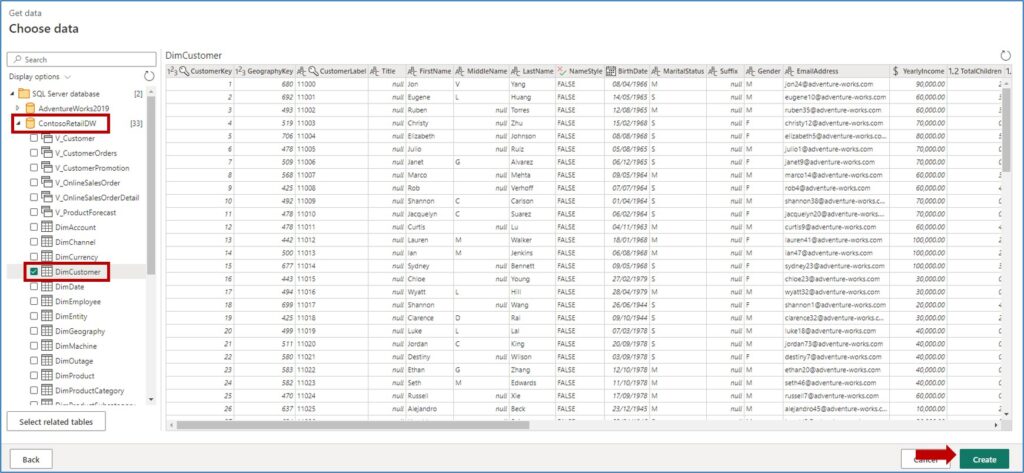
Once you hit next, you will get connected to the on-premises Contoso Sales database and can select tables that you want to pull in. I am just bringing in one table for now DimCustomer and hit Create.
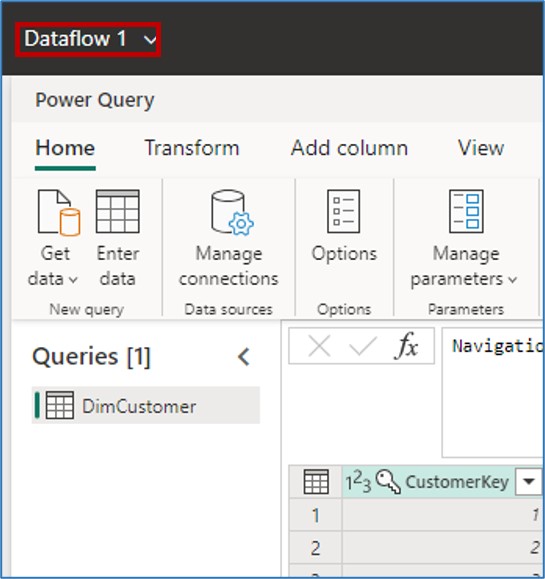
In few seconds your table gets loaded and you see a very familiar Power Query Online editor. Once the table gets loaded, renamed my dataflow from Dataflow1 to ContosoDataflow.
Assigning a Destination for Dataflow to write the Data
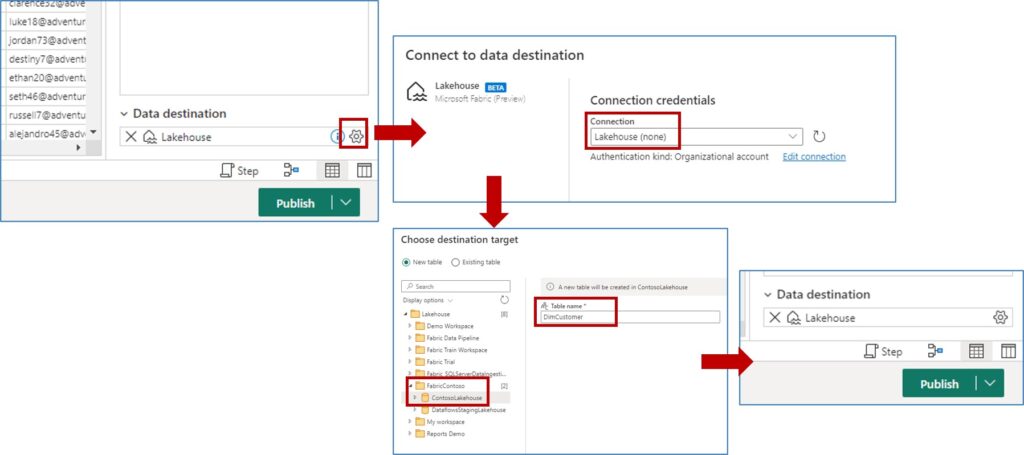
When you work with Dataflow Gen 2, make sure to assign a destination for the dataflow to write the data to a place. We click on the little gear icon against the Destination, this opens a new window where you just select Next with the Lakehouse selected as a connection. A new window appear. Here I select my workspace = FabricContoso and within that ContosoLakehouse which we created in the starting part of this blog. In my image you will see additional fabric workspaces as I have got few more in my tenant. Then I will hit Next after choosing the destination target as mentioned above. I have kept my table name to be DimCustomer. You can change it if you want to. Now on the next window just hit Save Settings. Power BI here is just checking the column name conventions, leave it as it is. Now I hit Publish on my dataflow.
The moment I hit Publish, dataflow is saving the data to the given Lakehouse destination. It takes few minutes for dataflow refresh to finish.
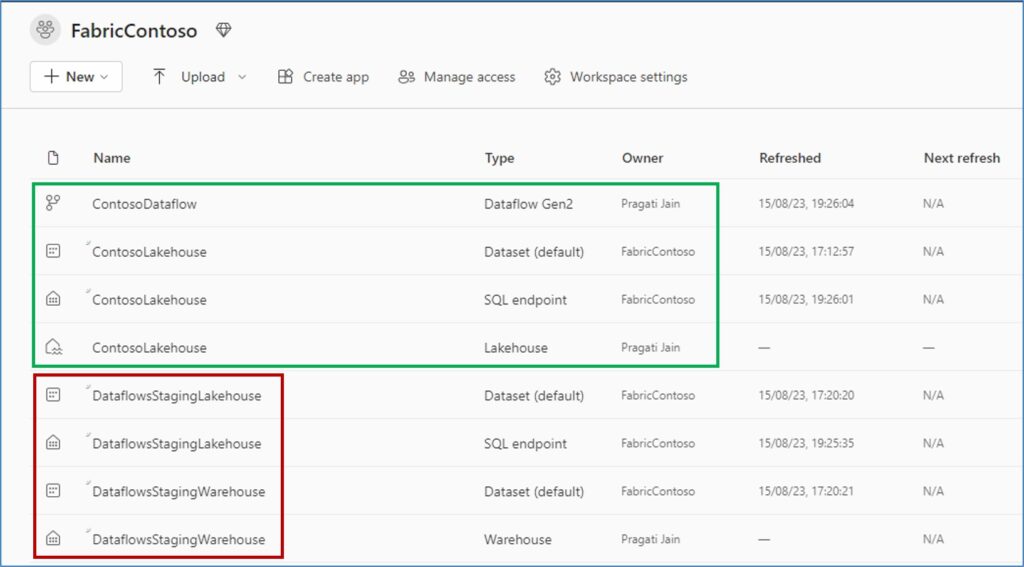
Finally, in your workspace, you will see few artifacts created.
- Artifacts highlighted in GREEN should be the ones you care about – ContosoDataflow, ContosoLakehouse, Contoso Dataset and a SQL endpoint.
- Artifacts highlighted in RED are the ones that Microsoft will be hiding soon as they are the underlying elements which should not be visible here.
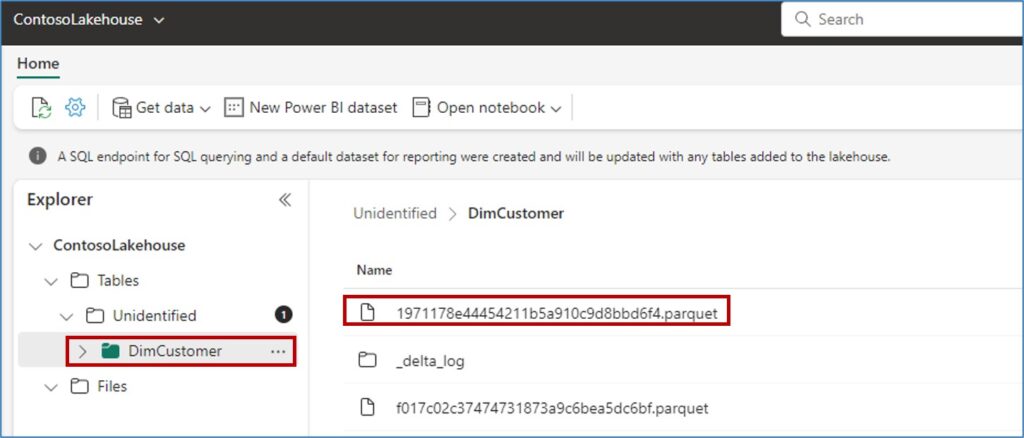
Next if we just go ahead and open our ContosoLakehouse (Lakehouse) artifact, we see a new window opens and DimCustomer table can be found under the tables written as a parquet file.
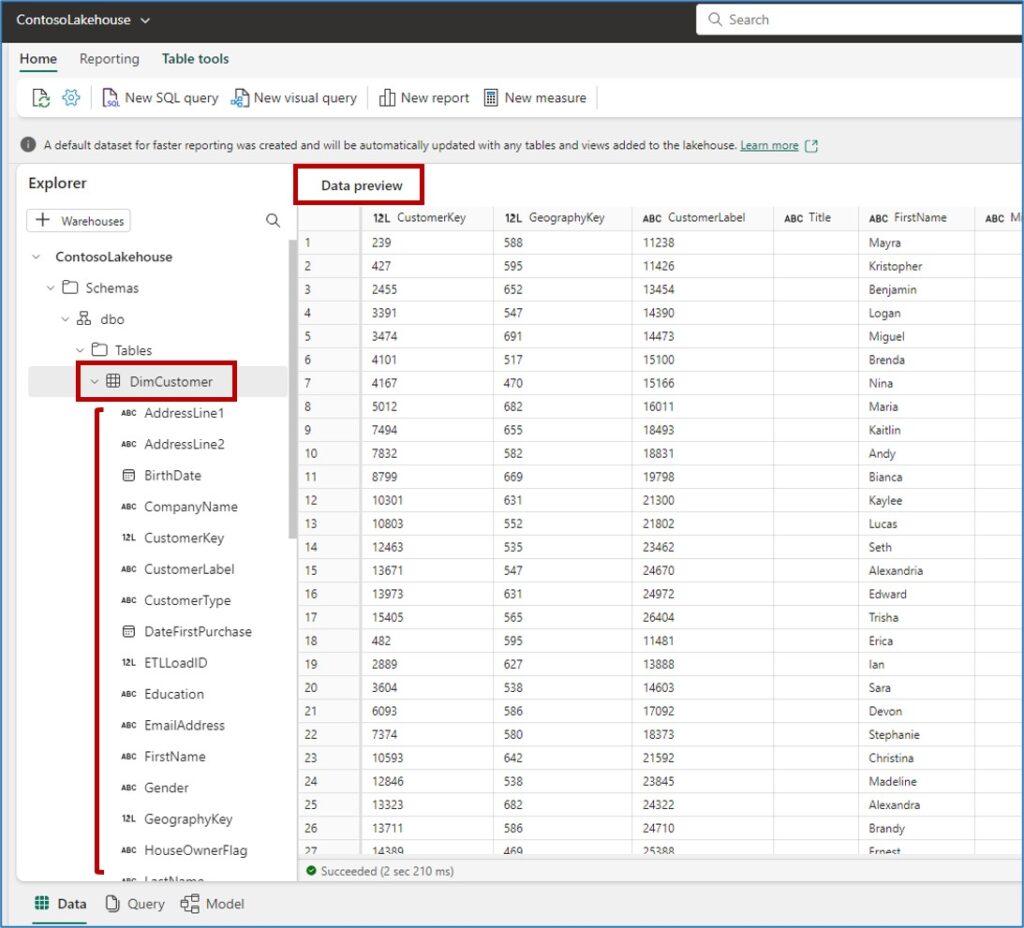
If I go back to my workspace and this time open the SQL Endpoint artifact, we end up seeing a better view of our DimCustomer table. It shows schema and Data preview for the table. This explorer can be really helpful when exploring the data, creating data model, calculations, etc. on your data.
I will end this blog here as the main aim of this blog was data ingestion – to ingest an on-premises database data to Fabric Lakehouse.
We will explore more details in the next blog – what are next steps after data ingestion in the Fabric environment.
Hope this blog gave you enough idea around how we can easily get our on-premises data into Fabric environment easily.
Happy Fabric Learning!
Pragati
We look forward to reading more. Big blog article. Thank you – Again. 112578100
Congratulations on the interesting content. 987544702
Thank you for providing these details. 53046427
A great blog here! Penny Objects 360342948
This is a great article. 82243959
Excellent article. Keep posting such kind of info on your site. 86608577
Thank you for great article, I followed step by step instructions you have mentioned.
However, I get error when running dataflow, it seems flow is not able to write the data to destination in data lake. here is the error I get any idea?
There was a problem refreshing the dataflow. Please try again later. (Request ID: 7b656cf2-0643-4b3d-88d0-f04d93d64950).
104203 Couldn’t refresh the entity because of an internal error
Hello,
Is the error still persistent?
There is definately a lot to find out about this subject. I like all the points you made
I just like the helpful information you provide in your articles
Great information shared.. really enjoyed reading this post thank you author for sharing this post .. appreciated
I am getting this error while trying to load it to lakehouse
Something went wrong while retrieving the list of tables. Please try again later.: An exception occurred: Microsoft SQL: A network-related or instance-specific error occurred while establishing a connection to SQL Server. The server was not found or was not accessible. Verify that the instance name is correct and that SQL Server is configured to allow remote connections. (provider: Named Pipes Provider, error: 40 – Could not open a connection to SQL Server) (Session ID: a69713a2-9461-4b5f-bd0d-66835933b669, Region: europe)